The Stripe add-on needs to be installed and activated to see the features mentioned in this this documentation.
Note: Make sure your website meets Stripe security standards before use
Stripe has specific HTTPS and TLS security standards that your website must meet to be able to use their service to collect payments. If your website does not meet these security standards, you will not be able to communicate payment information to the Stripe service. Please see their documentation for details. If you have questions about your WordPress website meeting these standards, please contact your hosting provider.
Table of Contents
- Connecting Ninja Forms to Stripe
- Setting Up a Stripe Action
- Accepting Additional Types of Payments
- Enabling Testing Mode
- Processing of the Stripe Payment on Form Submission
- Want to Change the Currency?
- Stripe Merge Tags
Connecting Ninja Forms to Stripe
The first step to using Stripe with Ninja Forms is getting your API credentials. This will allow your forms to communicate with Stripe and is a required first step before payments can be collected.
You can find your API credentials in your Stripe dashboard.
Note: In your Stripe.com account, navigate to the “Developers” page and ensure that the Stripe API Version is set to at least version “2022-11-15”.
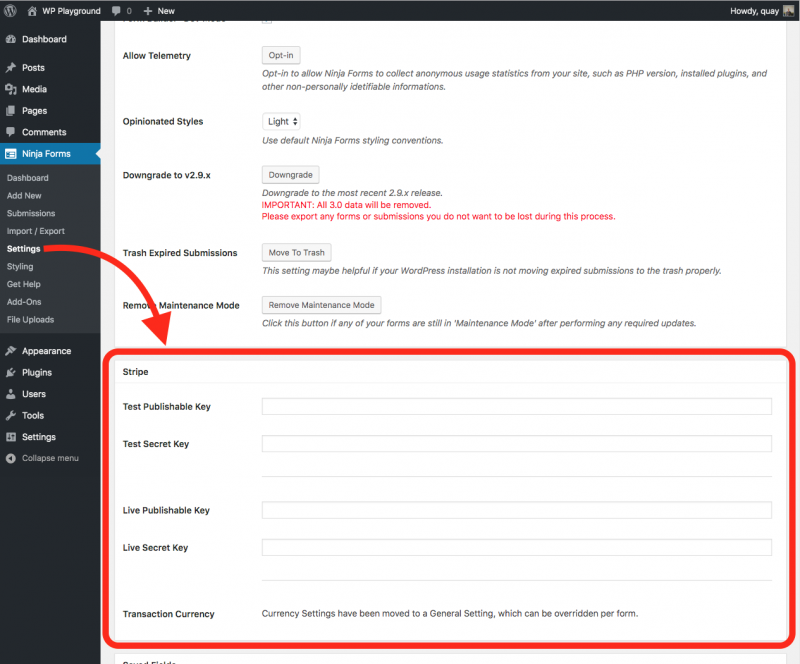
Enter these keys into your dashboard under Ninja Forms > Settings > Stripe. Be sure to Save Settings after.
Setting Up a Stripe Action
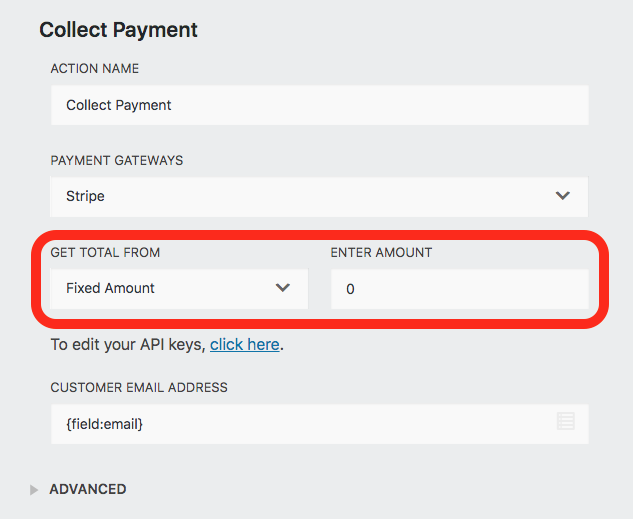
To add the action to any form, from the Emails & Actions tab click Add New Action and then the Stripe action from inside the Actions Window that opens.

You now need to set the total that will be sent to Stripe in the GET TOTAL FROM setting. This can be one of four options:
What each of those mean and how their configuration options are covered in the sections below.
In the Customer Email Address setting, a merge tag for the email field of your form can be entered to pass into Stripe associated with this charge. This can be used within Stripe to send a receipt.
[su_accordion]
[su_spoiler style=”fancy” title=”Fixed Amount” anchor=”sp-Fixed-Amount”]
Charging a Fixed Amount
If the total sent to Stripe is a static amount that will never be different from purchase to purchase, select the Fixed Amount Option. Simply enter the amount you wish to charge in the ENTER AMOUNT setting.
When the form is submitted, users will be prompted to pay this fixed amount via Stripe.
[/su_spoiler]
[su_spoiler style=”fancy” title=”Calculation” anchor=”sp-Calculation”]
Using a Calculation to generate a total
If you are charging variable amounts per purchase via a Ninja Forms calculation, that total can be sent to Stripe directly as the amount the user will be charged.
Simply select Calculation from the GET TOTAL FROM setting, and then select the calculation itself in the SELECT CALCULATION dropdown.
When the form is submitted, users will be prompted to pay the calculation’s value via Stripe.

[/su_spoiler]
[su_spoiler style=”fancy” title=”Field” anchor=”sp-Field”]
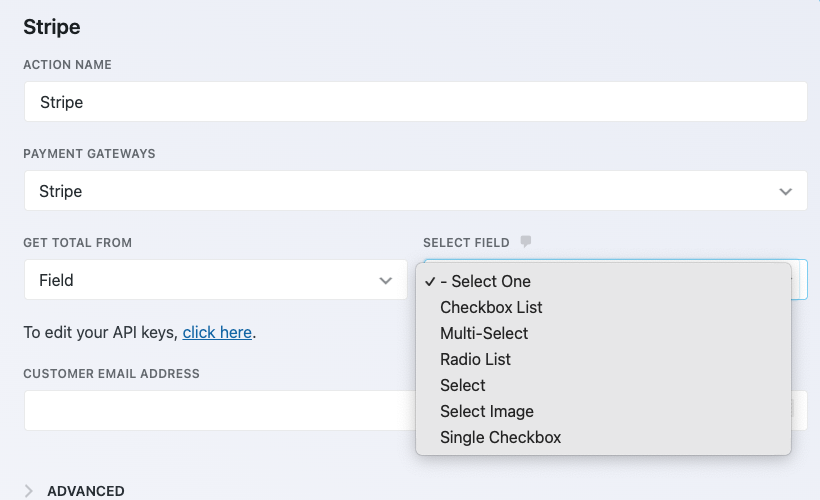
Using a form field as the total sent to Stripe
If your purchase total is contained within a field that has a calc value, you can have the value of that field sent directly to Stripe. Simply select the Field option from the GET TOTAL FROM setting, and then select the field that houses your from the SELECT FIELD dropdown.
Only fields that have a calc value will be available to be selected from.
The following fields have a Calc Value setting:
- Single Checkbox
- Checkbox List
- Select List
- Multi-Select
- Radio List
- Select Image
- Number
When the form is submitted, users will be prompted to pay the field’s value via Stripe.
 [/su_spoiler]
[su_spoiler style=”fancy” title=”Recurring Payments” anchor=”sp-Recurring”]
Accepting recurring payments
The Stripe add-on has the option to connect to your Stripe recurring payment plan.
You will need to have a recurring payment plan configured in your Stripe account to use this feature.
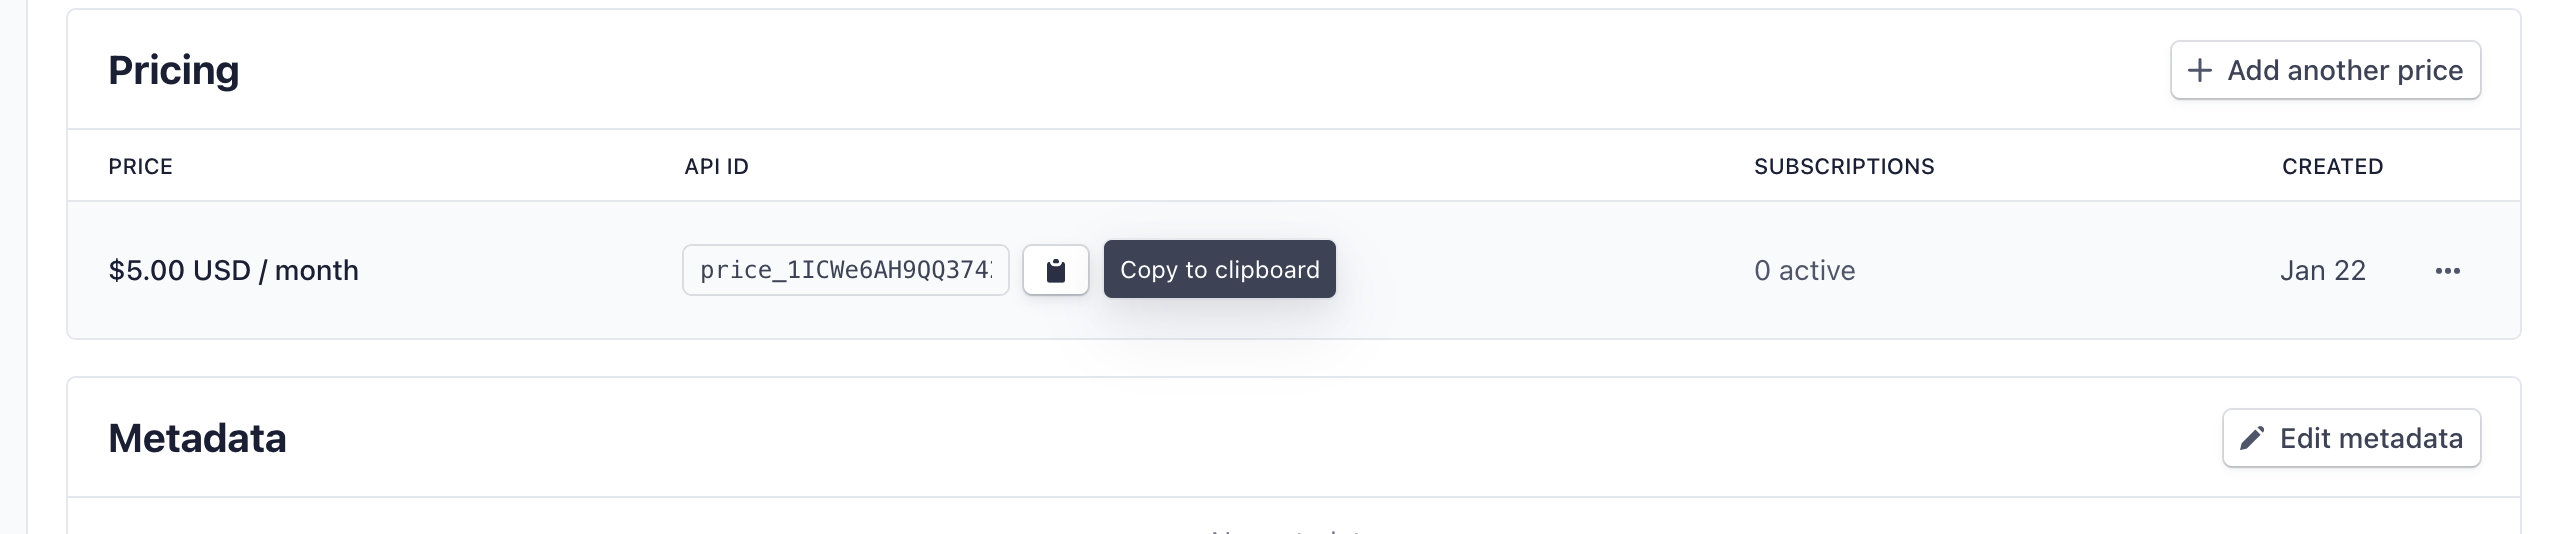
1) To retrieve the payment plan ID navigate to your [su_highlight background=”#fffc99″]Stripe Account > Products > Product[/su_highlight]. After you have created your recurring product you should see it appear in the Product menu,

click the name of the Product, scroll down until you see, [su_highlight background=”#fffc99″]PRICING[/su_highlight], and then copy the API ID.
Single Product
Under the Advanced setting of the Stripe action, enter the Recurring Payment Plan ID from your Stripe account:

Variable Product
- Add a Select field to your form. The labels correspond with the price and the values correspond with the Stripe subscription ID
- Within the Stipe action itself ( Emails & Actions > Stripe action ) under the Advanced drop-down, add the [su_highlight background=”#fffc99″]Select field[/su_highlight] merge tag to the[su_highlight background=”#fffc99″]Recurring Payment Plan ID[/su_highlight] field.

All payments accepted via this action will now be routed to that plan.
[/su_spoiler]
[/su_accordion]
[Jump to top]
Accepting payments from additional payment types.
Under Advanced settings in the action, there is a new toggle with two states:
- Card Only [default]
- All Methods
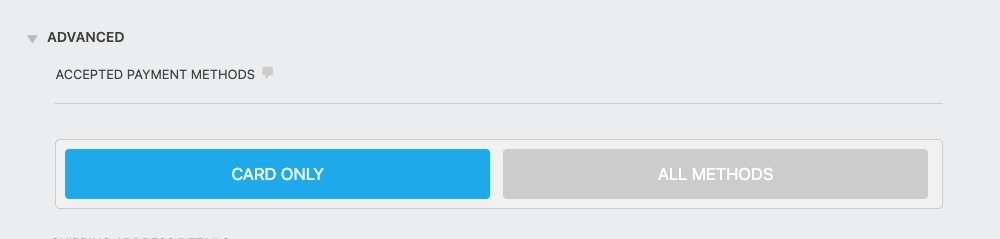
If the admin has selected Card Only, only credit card options will be presented in the Stripe Checkout window when the form is submitted.
If the admin has selected All Methods, all payment methods that the admin has enabled in their Stripe account will be presented to the customer in the Stripe Checkout window.
[su_accordion]
[su_spoiler style=”fancy” title=”Full list of supported payment types” anchor=”payment-types”]
Card Payments (+ card wallets, listed below)
- American Express Checkout
- Apple Pay
- Google Pay
- Masterpass
- Samsung Pay
- Visa Checkout
- Paypal (Currently only available for Stripe businesses based in the EU (except for Hungary), Liechtenstein, Norway, the United Kingdom, and Switzerland.)
- For this payment method, it is required that you use the “Shipping Address” section of the Stripe Action or this will not work.
Bank Debits
- ACH Direct Debit
- Bacs Direct Debit
- BECS direct debit
- Pre-authorized debit in Canada (Acss)
- SEPA debit
Bank Redirects
- Bancontact
- Bank Transfer
- BLIK
- EPS
- FPX
- Giropay
- iDEAL
- P24
- Sofort
Buy Now, Pay Later
- Affirm
- Afterpay and Clearpay
- Klarna
Real-time payments
- PayNow
- PromptPay
Vouchers
- Boleto
- Konbini
- OXXO
Wallets
- Alipay
- GrabPay
- WeChat Pay
Note re Google Pay & Apple Pay: Apple Pay will only be present under the below conditions. If one of these conditions are met, Apple Pay will display instead of Google Pay. Otherwise, Google Pay will be present in the Stripe Checkout payment window.
- Mac: Safari only, must be 2019 MBP or newer (the touchbar model)
- iPadOS: Safari only (2019 iPad Pro or newer)
- iOS: iPhone X or newer with Apple Pay configured (All browsers *should* work as they are Safari based)
[/su_spoiler]
[/su_accordion]
Sending additional details to Stripe with the charge
You can send Shipping Address information to Stripe with the payment by turning on the Show Shipping Address toggle under the Advanced Settings of the Collect Payment Action.
To change the Product name that is sent to Stripe, you can go to the Advanced settings and you will see the field, Product Name
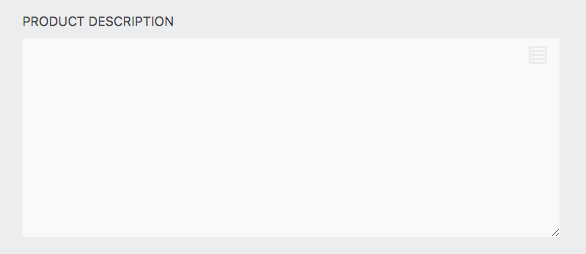
If you want to include a description of the product(s) into Stripe or other details when the charge is processed, that option can be found under the Advanced settings of the Stripe action.
You can send an image to Stripe for the product purchased by filling out the Product Image URL field. Note: This URL must be a valid URL for the image you want to use.

Additional metadata can also be sent to Stripe by setting up key-value pairs in the section provided under the Advanced Settings of the Stripe Action.

To find out more information about Stripe Metadata, you will need to reference the Stripe API documentation.
Enabling Testing Mode
To enable testing for your form, toggle on (green) the Test Mode setting. This setting is found under the Advanced settings of the Stripe action.

With the appropriate Test API credentials entered as described in the Connecting Ninja Forms to Stripe section above, submitting the form in this mode will allow you to test the form with Stripe. This must be toggled off to accept live payments.
Stripe also provides a list of test credit cards that you can use while testing:
https://stripe.com/docs/testing
Test Card Example:
4242424242424242
Processing of the Stripe Payment on Form Submission
As of version 3.1 of the Stripe add-on, the plugin has been updated to meet the Strong Customer Authentication (SCA) rules required for payments from EU users. This is done through the Stripe add-on by using Stripe’s 3D Secure Card Payment
Live payments require payments to come from a secure page on your site. Make sure that you have set up an SSL certificate and at least TLS 1.2
When a user makes a submission on the form that has a Stripe Collect Payment Action activated on it, the user will be forwarded to Stripe’s site (https://checkout.stripe.com) to make a secure payment.

Once the payment is made, the user will be sent back to your site to complete the payment token in Ninja Forms. The rest of the form actions will then process.
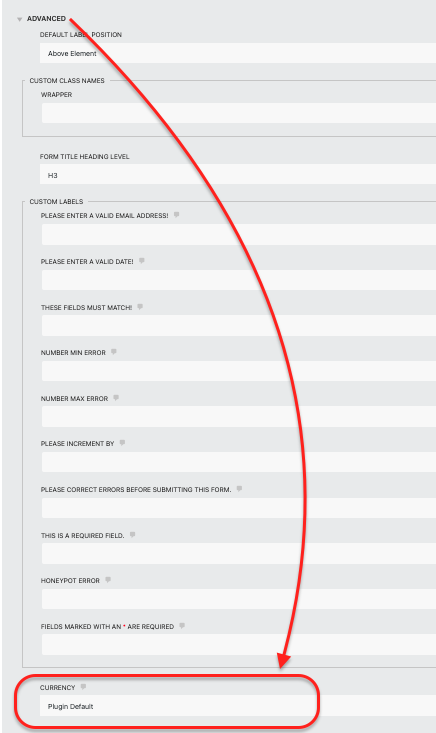
Want to Change the Currency?
By default the form will display currency in the proper format as determined by the language selected under the WordPress General settings for the site, or as set by the Currency setting within the Ninja Forms settings.
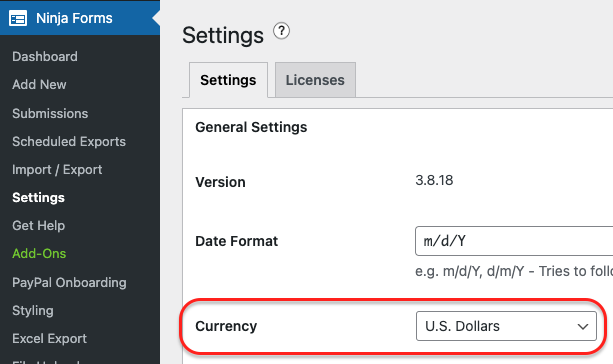
If you wish to use a different currency format in the individual form, it can be selected from supported options, which can be found under the ‘Advanced’ tab > Display Settings > Advanced > Currency.
Stripe Merge Tags
[su_tabs][su_tab title=”Last 4″ disabled=”no” anchor=”” url=”” target=”blank”]
{stripe:last4}
This returns the last 4 digits of the Credit Card from the Stripe payment. The data from this merge tag is not populated until after the payment is made. This merge tag will only function when “Card Only” has been selected by the admin.
[/su_tab]
[su_tab title=”Card Type ( Brand )” disabled=”no” anchor=”” url=”” target=”blank” class=””]
{stripe:cardtype}
This returns the Credit Card type from the Stripe payment. The data from this merge tag is not populated until after the payment is made. This merge tag will only function when “Card Only” has been selected by the admin.
[/su_tab]
[su_tab title=”Customer ID” disabled=”no” anchor=”” url=”” target=”blank” class=””]
{stripe:customerID}
This returns the Customer ID from the Stripe payment. The data from this merge tag is not populated until after the payment is made.
[/su_tab]
[su_tab title=”Charge ID” disabled=”no” anchor=”” url=”” target=”blank” class=””]
{stripe:chargeID}
This returns the Charge ID from the Stripe payment. The data from this merge tag is not populated until after the payment is made.
[/su_tab][/su_tabs]
[Jump to top]
[su_divider top=”no” divider_color=”#ccc” size=”8″ margin=”50″]
[su_box title=”Tutorials & Blog Articles” style=”noise” box_color=”#eceff7″ title_color=”#EC494D” radius=”8″]
CalculationsSCA Compliance Accepting DonationsAccept Payments Recurring Payments Upsell Subscriptions Accept Apple Pay Accept Google Pay
[/su_box]